Fare comparison documentation is required when any of the following occur:
- The trip includes a personal component.
- The itinerary is an indirect route.
- The airfare class is above economy and the comparison will be used to allocate excess costs appropriately.
- The most economical method of transportation is not selected for a trip, for example, a rental car is selected instead of air travel.
- The airfare will be charged to a sponsored research award and will be booked outside of the Stanford Travel program.
Learn more in the Airfare Policy.
Document a Flight Comparison
Before You Start
The fare comparison documentation is most often in the form of a screenshot of Stanford Travel of search results taken the same day of booking from a Stanford Travel booking channel. The screenshot must visibly note the time and date of the search (i.e., from the taskbar on your desktop); include a broad set of search results (e.g., all applicable carriers); and should display the applicable parameters, such as the most direct route, excluding any personal stops and the appropriate fare class (e.g., coach, non-refundable). The expense report must include an attachment with the fare comparison documentation.
If the attached screenshot is dated post-travel, the Business Expense team will calculate an online comparison at the time of processing, and will pay based on the lesser of their own comparison or that provided by the traveler.
- Go to stanfordtravel.stanford.edu
- Enter your SUNet ID and password
- Select Flights
- Select the traveler's Profile
- Enter the travel business location
- Select the travel dates of the flight for the business travel
- Select the class of flight allowed under Air Travel policy
- Select Search Flight
- Adjust the stops by selecting Non Stop if the flight you booked was non-stop
- Adjust the Departure Time and/or Arrival Time to match the date and time of business travel
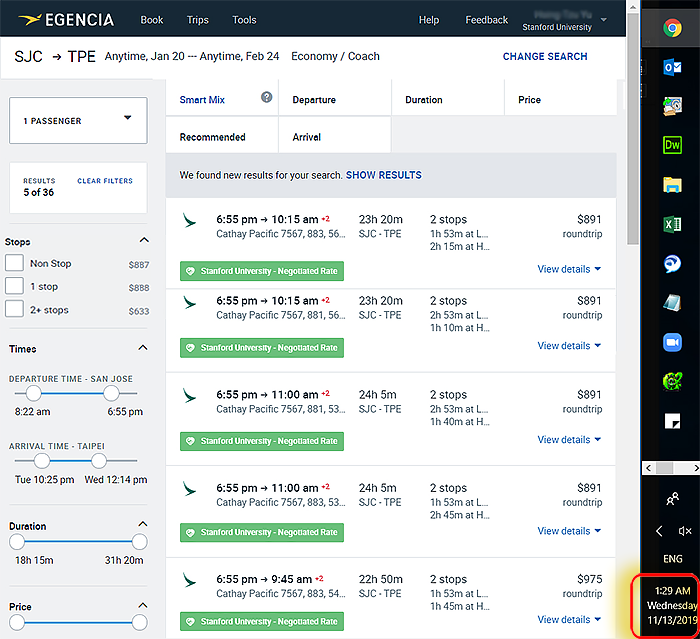
- Make sure the date and time on your computer desktop are shown in the screenshot
You can also hover over the time on your computer the moment when you capture a screenshot. - Take a screenshot of the displayed results
Screenshot requirements:- The date the screenshot was captured.
- At least four comparable flights.
See example screenshot
- Save the screenshot. This screenshot must be attached to the expense report in the Expense Requests system.
- Attach the screenshot of the comparison to the expense report in the Expense Requests system.
- All flight comparisons are subject to travel approval. The Business Expense Team reserves the right to re-run a comparison on any submitted flight.